EVENTS IN IONIC FRAMEWORK
Since Mobile apps are now becoming part of new age humans and there use increased a lot. Many daily use mobile apps have increasingly come up with touch technology as its spearhead. Although being complete UI based framework when combined with JavaScript (AngularJS) Ionic Framework has the full potential to become one of the best mobile apps development platform.
Ionic Framework has a lot of default events which are coded frequently with most of the complex functionality. ‘on-touch’ even is called upon as you touch the screen immediately. Ionic event ‘on-hold’ is called when your touch stays at the same place for more than 500ms (milliseconds), ‘on-tap’ is another touch event for time less than 250ms. When you double tap touch than ‘on-double-tap’ event is called.
Similarly ‘on-release’ when the user ends the touch; ‘on-drag’ when drag event occurs and on-drag-up (left, right, down) are called as move your touch on the screen considerably. Whereas Swipe is another event which has become quite famous with young generations and it uses ‘on-swipe’ with up, right, left and bottom for making sure user has all the right option for choosing the right selection effectively. These all are part of ionic gestures and event which are used with AngularJS as its base.
Here we have enlisted Ionic Events Example with tandem in AngularJS to show how they are used more effectively. They can be applied to all the buttons, lists, Cards, Form, range etc. Their used in games, apps and programs is universally proven to be success with touch functionality in newer Smartphone’s.
UNDERSTANDING THE ANGULARJS POST METHOD
AngularJS is now the need of the hour with its simplifying methods and procedures. There are basically two methods through which you can communicate via server i.e. POST & GET method; here we will explain to you how we can do the AngularJS HTTP post. For communicating with the servers we prefer AngularJS HTTP post Method for safely communicating via JSON or XML http request.
From beginning you need to understand the syntax and parameters for passing the information more accurately.
AngularJS $http.post Syntax:
 $http.post(url, data, [config]).then(Callback);
Upon Performing the Returns are accessed!
Every parameter in the above syntax needs to resolve carefully. URL points to where data will be loaded; data stands for the information you want for the post; Config is the optional configuration object; Callback function so you know it has worked successfully.
On server side you can use your preferred language i.e. PHP, ASP or anything your project requires, just use the appropriate code for making this procedure correctly. Using this simple method you can also pass multiple parameters with $http post method

HTTP headers are added by default to each request you pass to server which can be overwrite using new lowercase HTTP method name.
We have created a demo AngularJS http post method example for you where everything is explained step by step for you. Once you hit the try-it-editor you can add the inputs there in the register form and you will get the data being shown in the table below instantly hence proving our objective regarding this peculiar HTTP post method in AngularJS. Also get extra information on how to overwrite HTTP headers with complete JSON example and code too. You can also checkout the video for how the things are done where each step one by one is explained.
Making Tables with Bootstrap
In Our last article we studied about align property in Bootstrap, in this week we are going to know more about making tables in Bootstrap with different attributes. Bootstrap is one complete CSS framework from which modern web designs are now built. A lot of other CSS frameworks have come in the industry but still Bootstrap is one which stands as the most versatile and complete in I.T. web development. Before ‘div’ came and conquered the web designing portion of the website building, ‘Table’ was the most used tag for making websites but soon new tags overcame the difficulties of using this complex tag. But there are still many circumstances where we need to implement the Table tag exclusively like while showing data in sheet like format than table is still the most preferred use.
Bootstrap Tables
In Bootstrap table can be designed with their basic HTML tags only, but with this framework you can multiple styling effectively making the design more suitable to the overall user experience. Bordered table, Condensed table, Bootstrap Table Strip (Check here all types of Bootstrap table with example, images and syntax) and also can easily use bootstrap table hover property as well. These all attributes are done with just applying the specific class to your HTML structure.

Bootstrap Make Table Row Clickable
This is an interesting conclusion where we need to make table row clickable like we implement in hyperlink. Now to do this exclusive task for Bootstrap Clickable Table Row this is done through with the help of the jQuery. After applying the code on complete row if you see the result the whole row is clickable with link where you want it to go just like hyperlink.
At Tutorialsplane we offer comprehensive tutorials on Web Designing and web development with syntax, code and try-it-editor. Here you can find Bootstrap tutorials, Magento, PHP, jquery, Laravel, Codeigniter (CI) and common fixes and solutions as well. We have also started Ionic tutorials as it has popularized with mobile app development. You can also message us for any enquiry and issues that you are facing while coding.
How to use align property more effectively in Bootstrap?
Bootstrap has become the standard of the modern web design sites with its popular easy responsive CSS classes. Since Google updated its search algorithm with special requirement on RWD (responsive web development), most of the sites have made their multi-platform designs. Also the recent increase in the multiple devices has forced the website owners to use this exclusive responsive Bootstrap framework as the base of their online business version. Bootstrap is a multiple grid based CSS responsive framework in which they use different classes that are makes changes in the versatile design as user moves from mobile device to tablet, to desktop or any other internet accessing equipment.
Aligning the things in the middle whether you are using ‘div’ or ‘Table’ it requires you to implement special circumstances along with technical expertise with perfection. Here is perfect example of how to use Vertical Align in Bootstrap with syntax, code and example. Idea is created by using simple separate classes that places the elements directly where the place is i.e. Vertical Top, Vertical Center or Vertical bottom.
Crux of the problem lies in using the combinations of CSS attributes correctly, you have to start with custom class and add display (inline-block), float (none) and Vertical Align (Top, Middle & Bottom attribute) collectively so that the desired result can be achieved without any conflict. What it does it creates a space where things are put in the container of the parent element according to the direction i.e. Top, Middle & Bottom.
So whether your design structure is in div or table adding this custom CSS can give you the desired structure easily. Check out more comprehensive Bootstrap Tutorials with step by step expert guidance for teaching the next generation about web designing. In many responsive framework that have started their own custom CSS, Bootstrap stands as on of the strongest to be used among the practical web designing lessons. We at Tutorialsplane have written special courses that marks the guidance for beginners with perfection.
MAKING LISTS WITHIN IONIC FRAMEWORK
Ionic Listing is one of the strongest features of this framework with drag to reorder, editing, swipe to edit and pull to refresh can be introduced inside these coding structure with the use ionic directives only. Displaying Ionic List in this application framework requires you to follow some basic rules which involve using specific classes for ‘ul’ and ‘li’ element in HTML5 code with list and item respectively. Applying the code will result in the below image directly as it has default code for making things easier with just HTML5 basic layout skills.
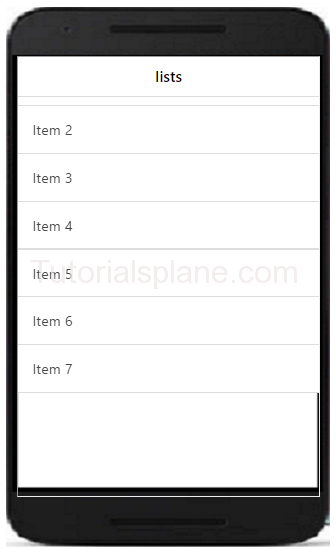
For better organizing and grouping one can also add the List dividers to specific ‘li’ for making sure they have proper difference in the navigation structure with respect to user behaviour. This provides different color and font-weight to that specific ‘li’ item from the rest displaying it as the parent and child. One can also simply add icons to this Ionic list example with <i> tag only using position item-icon-right for right and item-icon-left for left. You can add these classes to their parent tag for ‘i’ element for regular behaviour.
Item Avatar functionality is available too with images as default round using border radius property. For displaying large thumbnails inside ionic list there is default code with item-thumbnail which can be given the position left or right specifically to match the requirements of the design respectively. Using Inset Lists this whole structure is designed to avoid the full-width layout structure as well to show better designing capabilities.
Start learning Ionic tutorials with Tutorialsplane authentic guide especially for beginners, they are step by step explaining the use of all the basic fundamental of this amazing Ionic Framework. For freshman and newbie learners this is the place to start their mobile application learning skills with easy examples, syntax and live demo for understanding the depth of this mobile framework coding. Here you go through all the CSS components and JavaScript Components for strengthen your core basic as well Ionic FAQ that will prepare you for the complex situations in your career ahead.
HOW TO MAKE AND ALIGN BUTTONS IN IONIC FRAMEWORK EASILY?
Ionic provides rich default functionality for creating buttons within its framework only. Creating Buttons with Ionic framework is done with the help of basic html tags only. For better mobile experience developer must create buttons that are easy for user behaviour and provide clear display of their functioning with its purpose respectively. We have created ionic button example with syntax and code that can help you get the basic understanding of the Ionic learning.
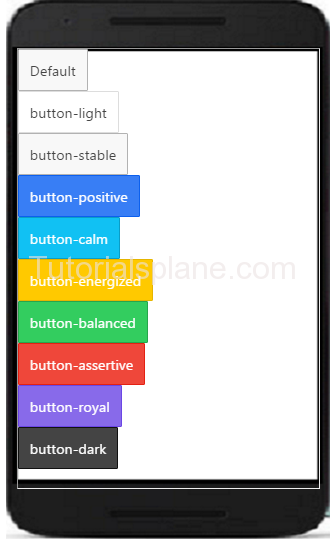
There are many basic button class attribute being applied to this their framework i.e. default, light, stable, positive, calm, energized, balanced, assertive, royal and dark. One just need to the specific class to their respective tag for making the applied changes to the structure successfully. Button can be block, full width, outlined, clear and with icons to place them in headers and footers respectively.
Aligning buttons to the exact place provides proper navigation and adds to its design perspective as well. Whole code is based on html dependant structure with specific classes being attributed to their respective alignment. Left is the default position with ‘text-align’ class being attributed to it. For ionic center button use the class ‘text-center’ which will align the button in the center of the screen whereas ionic align right will put the button ‘text-right’ on the right corner of the screen respectively.
Tutorialsplane offers rich source for learning Ionic Framework tutorial for beginners with step by step expert guidance. Find more quick fixes, solutions and live examples to get into mobile development experience with our online tutorials. From basic CSS components to JavaScript components you will learn each part with steps, example and live editor to make your level to next step in these exclusive tutorials built to help beginners in mobile application development.
MAJOR COMPONENTS OF IONIC FRAMEWORK
Within a few short span of time period of its beginning Ionic Framework has gained a reputation for mobile application development in this new I.T. generation. With mobile apps forming the core of modern gadgets with new technology advancements, Ionic can be the one solution our future can bank upon with exemplary results. Most of the inner working of Ionic is based on angular only that has major role in the structure of this programming language. For beginners one must understand the basic fundamentals of Ionic by starting with these components.
CSS Components
These are more basically related to the design of the mobile application. If you know the right classes to be applied than you can use the direct in-built functionality for better results easily. Header, Footer, Content, List, buttons, Cards, Forms, Toggle, Checkbox, Radio buttons, toggle, range, select, tabs, grid and utility form the CSS component of the ionic framework. For example: – For Ionic Content the directive to be added i.e. similarly these things allow you to add basic functionality without any added directions in the code. Similarly for making effective color change one just need to add the respective class to their elements.
JS COMPONENTS
JS adds more practical effects and solutions to the Ionic framework along with its CSS components. Each of these functions when added with its CSS part gives amazing results that constitutes the Ionic platform. Actionsheet, Backdrop, Keyboard, loading, modal, Navigation, popover, popup, Scroll, Side Menus, Tabs, tap and click are some of the JS functionality which are customized to meet the requirements of the project. For example: – With Ionic Scroll one can create scrollable area inside the app.
Overall Ionic provides vast in-built functionality with CSS and JS components. There are also numerous extensions through which codes are accommodated to meet the project requirements. There is also CLI utility with Ionic which runs from shell/terminal which makes it easy to build, run and emulate the mobile apps in Ionic. Our Tutorialsplane online platform is equipped with Ionic framework tutorial for beginners step by step with expert guidance. Suitable examples and codes are provided for simple explanations. Find comprehensive information for learning this new mobile application programming language at our online tutorials now!
HOW IONIC MODAL WORKS?
Ionic modal is the part of the JavaScript component of the Ionic basic fundamentals. It features as the content pane over shadowing the regular content. This is called upon when the user looks for different choice or editing a particular item respectively. is the standard tag in which content is placed for using in Ionic Modal respectively.
Controller code is explained below for use in modal part of this application development programming. Ionic modal controller includes basically the following main methods.
- show() shows the modal instance when called upon
- hide() respectively hides the ionic modal
- remove()this command removes the modal part
- isShown()checks the status of the shown modal in Boolean
Remove () is called whenever the each model is to be closed and to avoid further integration as necessary.
A perfect Ionic modal example must include the use of HTML part and controller part for students to learn the understanding the use of both as separate & individual units both. So they can learn to use them both i.e. Template and regular HTML version file with script tags specifically.

Tutorialsplane ionic tutorial for beginners are written with step by step and with expert guidance providing comprehensive knowledge for learning this language. This basic guidance will take you on the path for becoming a expert in Ionic Programming. Once can easily start making mobile apps in both native as well as hybrid environment in this highly useful Ionic Language. Its completely free open source SDK, so one can use them personally and commercially without any hassle. Built along with HTML5 framework, Ionic is used to build future mobile apps with incredible results to sustain the modern challenges.
STEP BY STEP IONIC TUTORIALS PART V
With these tutorials we are going through basics of ionic programming. Last week we learnt from Ionic Action Sheet, Backdrop, Js Content, Ion-refresher, Ionic Events and Keyboard. This week are going to complete your basic Ionic Tutorials with Loading, Modal, Popup, Pop Over, Scroll and with Side-Menus. Let us begin with Ionic Loading which is the first appeared screen itself in the form of loader.

IONIC LOADING
This futuristic app technology also has separate Ionic Loading feature where one can easily apply the loader thereof. There is show and hide functionality which is to be programmed as per the requirements using JavaScript only. Our Ionic Loading example shows the correct syntax with demo as well try it editor so you can test you code entirely there. Loading service is to be imported in the controller for using this functionality effectively.
IONIC MODAL
Ionic modal is part of the area which is used with popup and can be programmed to work for multiple rich functionalities. There is default Ionic Modal present in this language which can be easily customized to meet your application demands. <ion-modal-view> is the default area where HTML portion of the modal content is placed. Once put inside all the values than found in the real time app working. Here is one basic ionic modal example where complete controller code for opening and closing code as well as HTML portion of this amazing modal functionality.
IONIC NAVIGATION
Navigation is one of the primary attractions of every modern app. Using AngularUI Router for navigation; Ionic distributes them into various states. With each state have their unique name and respective URL’s. Ion Nav View, Ion View and Ion Nav Bar collectively form the three basic components of the Ionic Navigation being represented as ion-nav-view, ion-view, ion-nav-bar respectively. Find one complete ionic navigation example with complete controller code and HTML code with it.
IONIC POPOVER
With ionic popover functionality one can easily give additional information on element hovers, click with content that user should know. All the elements are placed inside <ion-popover-view> tag for Ionic Popover. You can also add icons, give different colors to highlight the main agenda of the information as you please. Get a comprehensive ionic popover example with HTML & Controller part
IONIC POPUP
For working there are basic three options of Ionic Popup provided in default which are than customized as per your requirements. Ionic Alert Box, Ionic Confirm box, Ionic Show Popup. $ionicPopup service is used for creating all these popup within Ionic. Check-out our basic Ionic Popup Example with complete HTML and controller part easily.
IONIC SCROLL
This Ionic functionality is used to create a scrollable container which when applied creates simple scroll with content inside it. Everything is placed between these basic Ionic elements i.e. <ion-scroll> </ion-scroll>. A lot of API’s are there with multiple options to choose the right scroll, paging, zooming, direction for helping the user with respect to reading content more easily.
IONIC INFINITE SCROLL
Whenever user starts reading the content and scrolls down to the bottom of the page than with using Ionic Infinite Scroll you can keep the content on that screen only rather than on multiple pages. This helps in users engagement throughout the mobile app. We have created ionic infinite scroll example where you can check out the complete controller & HTML part.
IONIC SIDE MENUS
For adding specific menus on particular left or right side this Ionic side menus functionality is of great help. These menus give user to control to switch their view from part of the app to another with just click. Find one complete ionic side menu example with controller JS part and HTML part as well as multiple components.
This marks the finish line of your basic ionic tutorials. With more practice and time you will learn Ionic features are robust, easy to build with and make new interesting apps for future driven functionalities. Get FAQ’s, interview questions and a lot more only on Tutorialsplane.
STEP BY STEP IONIC TUTORIALS PART IV
In current Ionic Framework has one of the most comprehensive SDK (software development kit) for making advanced hybrid mobile app development. On our tutorials, last week we learned about some more basics of Ionic Framework like ionic dropdown select, ionic tabs demo, Ionic Grid Structure, Icons and colors. For this week we are moving on Ionic Tutorials with more functions like Action Sheet, Backdrop, JS Content, Ion-refresher, Ionic Events and Ionic keyboard.
IONIC ACTION SHEET
Action Sheet is part of the slide panel which comes up from the bottom/side navigation for multiple options to choose from by user in mobile application. Clicking the back/escape key usually takes the user back to recent app-screen. Find here ionic action sheet example with syntax, functions and various action sheet methods available i.e. button, titletext, canceltext etc.
IONIC BACKDROP
Ionic Backdrop functionality is used for showing the overlay on the content screen which is just like intro-screen to the user. Ionic ‘retain and release method’ is implemented after importing the backdrop service. Check out the basic ionic backdrop example with syntax and more info on how to hide and show this functionality.
IONIC JS CONTENT
There is ionContent default provided in this framework for using scrolling related to the viewer’s screen. Content is put inside these specific tags for displaying in the browser’s screen. Infinite scrolling can be applied there using ionInfiniteScroll directive and ionRefresher for pull-to-refresh content respectively as the flowchart of the app demands.
IONIC ION-REFRESHER
In this mobile app framework Ion-refresher is the basic component for pull to refresh for scroll to view. This part of ionic refresher just puts the content inside the ionicContent or ionicScroll element. Find more about the syntax, html part of this amazing functionality at our ion-refresher example. This concept is perfectly suited to feed new list items from 3rd party sites i.e. Social Media Feed.
IONIC EVENTS
There are many in-built Ionic Events that are commonly used in the app development like on-hold, on-tap, on-double-tap, on-touch, on-release, on-drag, on-drag-up, on-swipe etc these all are basic functionality events. Learn how to use these basic ionic events with example now!
IONIC KEYBOARD
Ionic Keyboard is the functionality to call this input method from user whenever there is need for it. Keyboard automatically comes up when there is need to enter some input through keyboard. Main element has to be in the scroll’s view or directive through content to call this keyboard functionality in Ionic Framework. There are some specific classes attached to this custom functionality to alter its default behaviour i.e. Hide-on-keyboard-open when used this hides the div completely.
This was all for this week from next week we will move to next part of the Ionic Tutorials which includes Ionic Loading, Modal, Navigation, ionic Popover, Ionic Popup, Ionic Scroll, Infinite Scroll and Ionic Side Menus. This will finish the basic learning portion of your Ionic Framework. We hope you have taken the initial inputs on how Ionic functions and use them in advance practices for developing mobile application.

Recent Comments